Introduction:
In our first Citrix User Group Community kickoff meeting here in Dubai, I had the opportunity to present and demonstrate Citrix Cloud XenApp and XenDesktop Service integrated with Microsoft Azure.

In the span of 4 hours we were not only able to present on a high level of-course both Citrix Cloud and Microsoft Azure Architecture but also deploy the whole shebang from the ground up and test NetScaler/Storefront on Microsoft Azure integrated with Citrix Cloud in all 3 possible scenarios.
A question that popped up most of the time was if we had a full Microsoft Azure Datacenter environment, where would we save user data and profiles !? Excellent question and with Server 2016 Microsoft has the perfect answer. Come in Microsoft S2D Storage Spaces Direct on Server 2016 with Failover Cluster Cloud Witness. If you are not familiar with HCI solutions like Nutanix, VSAN, Simplivity, Hyperflex and now S2D , Its time you get up to speed and Fast !

In the realm of server 2012 R2 , the only option was to use DFS-R for highly available consistent file share repositories on Azure that would decently work for user profiles/data but with Server 2016 Microsoft released its own Hyper-Converged Infrastructure solution called Storage Spaces Direct “S2D” which leverages local disks on several servers to create a shared pool of disk that can be used in a cluster deployment. This HCI solution that is included for free with Datacenter license on server 2016 would allow us to utilize data disks attached to VMs on azure and formulate a failover cluster and build an SOFS Scale out file server on top to host user data/profiles making it highly available and really fast since premium “SSD” disks would be utilized for the same.
S2D on Azure VMs requires at least 2 virtual machines in an availability set to ensure HA and a minimum of 2 premium disks attached to each VM other than the OS disk. Premium disks in Azure come prebuilt with specific sizes ( each with a different price tag obviously more expensive than standard HDD disk which would not work for S2D on the cloud ) and uses Mirror to establish its usable capacity so you will get 50% of all premium disks added as usable storage for user profiles/data.
Sizing
Sizing is done based on the number of users and how much GB each user is going to be allowed to utilize. This would also dictate the type of VM (resources) to be used within Azure and type of premium disks attached which each have different size. A good table to follow is Microsoft recommendations for UPD profiles in regards to RDS , the same would apply in our scenario.

Let me explain one example to clarify the table and it should be enough for you to calculate your requirements exactly. Assuming we have 500 users and each user will 5GB of data size, the total usable premium disk that is required is 2.5TB so the total RAW required is 5TB since S2D uses Mirror RAID 1 so takes 50%. The recommended VM type to build the 2 S2D VMs is “DS2_v2” and each of these VMs will have 3 “P30” premium disk types so total of 6. Every P30 disk provides raw storage of 1TB so the total RAW would be 6TB and usable would be 3TB which is the nearest to our requirements.
Deployment:
Storage Spaces Direct on Microsoft Azure can be deployed in 3 ways:
-
Manually using Microsoft Azure GUI.
-
Using PowerShell.
-
Using an Azure ARM JSON Template.
I wont walk you through all three but rather use the template which is easy, straightforward, verified, and requires no manual work. Lets get started.
Prerequisites:
-
Resource Group Created on Azure.
-
VNET network Created on Azure (DNS pointing to Domain controller).
-
Domain Controller Created on Azure.
Step 1:
Login to Azure account and browse to https://azure.microsoft.com/en-us/resources/templates/301-storage-spaces-direct/?v=17.23h . Click on Deploy to Azure .

Step 2:
Fill in the required information based on the sizing conducted based on the table provided earlier. In my case I am going to deploy 2 Virtual Machines type DS1_v2 each with 2 premium disks type P10 “128GB” .

Provide Domain controller FQDN , domain admin user and password since the template will join machines to domain and create cluster. Specify the Scale out file server name required and the file share name to be created that will host the user data/profiles.

Accept terms and conditions then click on Purchase. Wait around an hour and the status should show as Succeeded .


Step 3:
Let us examine what did the script created and consider these as manual steps required if this is to be configured manually:
Virtual Machines

Storage Accounts

One is standard for Cloud witness , two are premium SSD hosting the data disks for each VM respectively.

Availability Set:

Computer Accounts:

DNS records:

Scale Out File Server Profiles Share:

Failover Cluster:

Virtual Disk CSV:

S2D Pool:

SOFS Cluster Share:

Step 4:
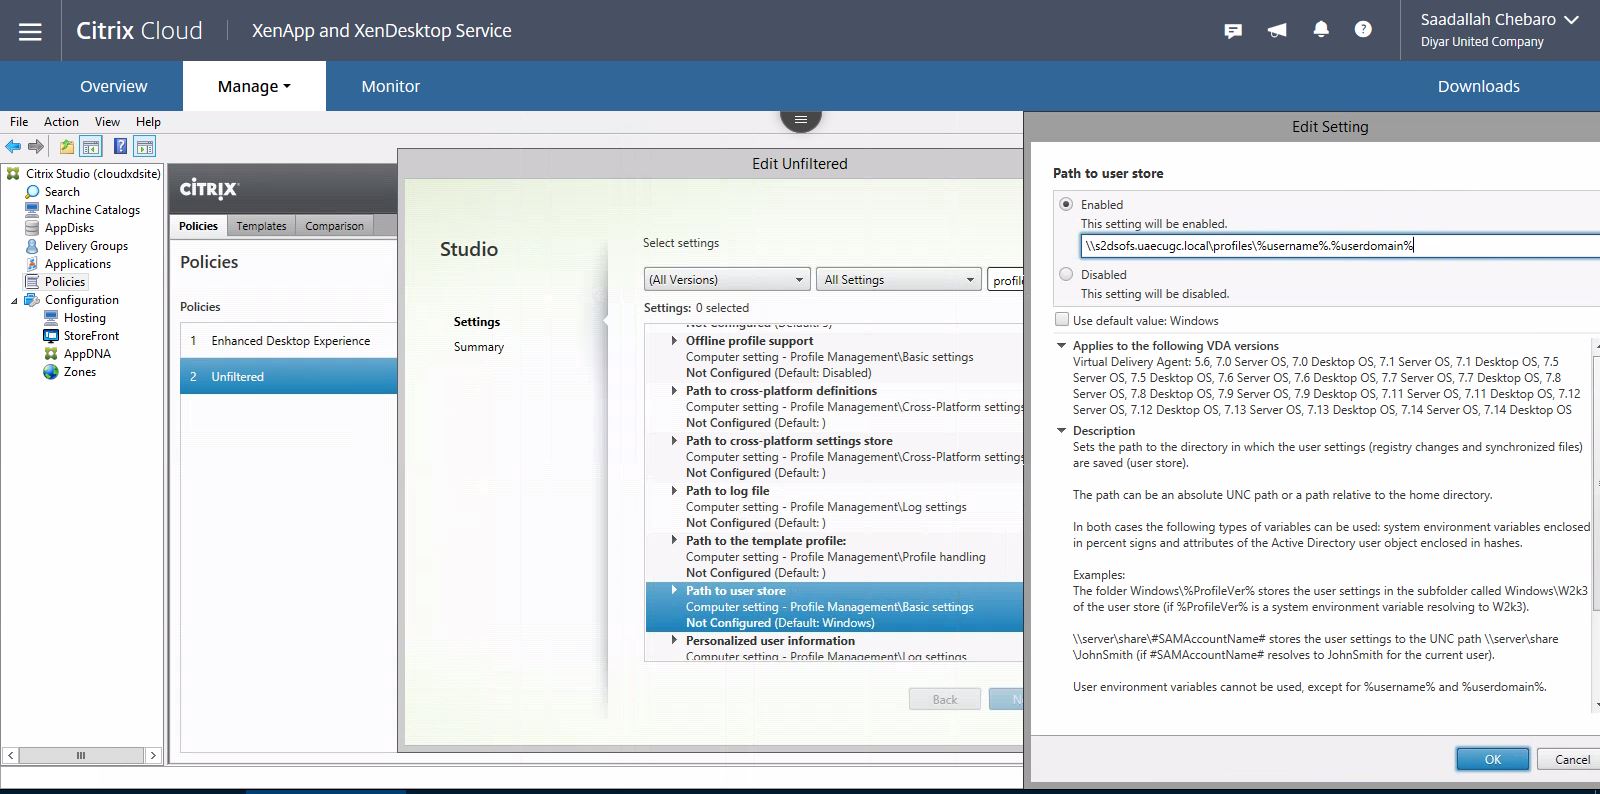
Configure Citrix Profile Manager and Folder redirection settings either by using Group Policy which I am sure every one is familiar with from within the Azure deployed DC ( don’t forget loopback processing ) or can be configured from within Citrix Cloud XA and XD Service or Studio if its an on-premise XD infrastructure.
Considerations
Everything seems to work out of the box but kindly note the following considerations for your understanding:
-
S2D VMs created had dynamic IP addresses so set them to static using Azure GUI or Azure PowerShell.
-
Failover Cluster Management GUI was not added by default so add it under Features | RSAT | Failover Clustering Tools | Failover Cluster Management Tools.
-
The Cluster IP is a non-routable internal IP because SOFS DNS records point to themselves in round-robin fashion but fear not the SOFS cluster role understands which server is hosting the SOFS role and forwards request to the operational server. In DNS you might see that the SOFS role is pointing to the S2D servers own IP addresses, this is normal in Azure and will operate correctly when failing over at least as per my testing.
-
Cloud Witness is used as quorum which creates a very small disk on Azure ( minimal cost less than a 1$ per month ).
-
Share and Security permissions can be changed from the SOFS Cluster role under Shares, double click the required share and set advanced security permissions.
Conclusion
I hope it has been informative and would love to hear your feedback. Hopefully in the coming days will also post the full deployment and configuration of Cloud XenApp and XenDesktop Cloud Service with NetScaler on Microsoft Azure including all types of Storefront/NetScaler possible deployments.
Salam ![]() .
.
Thank you for writing this article.
Under Prerequisites, you have written \”Domain Controller Created on Azure\”. What does that mean? Azure managed ADDS?
Hi Ankur, so what I meant was that mine was an AD VM created on Azure but this could be an on-prem AD as well as long as the s2D nodes can reach it ( S2S VPN or ExpressRoute ). I am not sure if Azure Managed ADDS would work.